The slow or long unpacking of Star Wars Jedi: Survivor is a common problem that many players encounter after installing the game on their PCs. This problem can be frustrating and time-consuming, especially if you are eager to start playing the game. The causes of this problem are varied and can be due to a variety of factors.
In many cases, this problem occurs due to the use of an outdated or slow hard drive, large game size, system resources, anti-virus software, lack of space on your hard drive, & game installation location. However, fortunately, there are multiple solutions that can fix your problem.
In this article, we have come up with all the effective fixes that can easily solve your problem. So, let’s take a look.
How to Fix Star Wars Jedi Survivor Slow/Long Unpacking
To resolve your issue, you need to
- Run the Game as an administrator.
- Update the Windows & Game
- Close Unnecessary Background Running Tasks.
- Restart Steam, EA Play & Epic Games
In case the problem still persists, then try the below potential fixes;
1. Set High Priority on Task Manager
If the Star Wars Jedi Survivor takes too much time for unpacking on Steam, EA Play & Epic Games, then setting the High Priority can resolve your issue. To do so, just follow the below steps;
- Open Task Manager.
- Scroll down the details tab until you find the launcher you’re using.
- Once there, right-click the program, select ‘Set priority‘, and ensure it’s set to ‘High‘.
2. Pause and then Resume Unpacking
Sometimes the unpacking process can get stuck so pausing and resuming it can get it back on track. Also, if still the game packing is stuck then the slow unpacking issue can be resolved by simply waiting for the process to complete. This may take some time, especially if you have a slower hard drive, so be patient and let the game unpack in the background.
3. Verify the Integrity of the Game Files
If you’re experiencing the issue of the Star Wars Jedi Survivor Slow/Long Unpacking issue on your PC, there’s a simple and highly effective solution that you can try. Repairing the game files has been reported to have a very good chance of solving this problem. To do so, just follow the below steps;
For Steam:
- Open Steam > Click on Library > Go to Home.
- Right-click on Star Wars Jedi Survivor > Click on Properties.
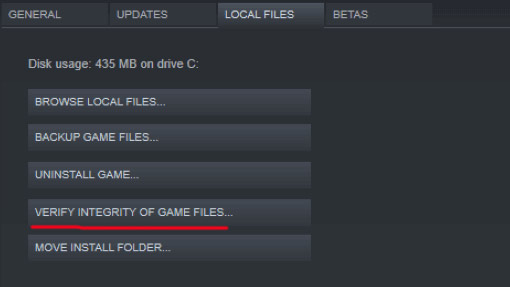
- Go to the Local files tab > Click on Verify integrity of game files.
For Epic Games Launcher:
- Open Epic Games Launcher on the PC.
- Click on the Game Library > Click on STAR WARS Jedi Survivor.
- Select Settings > Click on Verify.
- Close the launcher, then restart the PC to apply changes.
For EA Client:
To verify game files on the EA App (formerly known as EA Desktop and Origin), follow these simple steps to ensure your game is running smoothly:
- Launch the EA App on your computer.
- Sign in to your EA Account.
- Navigate to your game library by clicking on the “My Collection” tab.
- Locate the game you want to verify the files for.
- Right-click on the STAR WARS Jedi Survivor game tile, and select “Repair” or “Verify” from the context menu that appears. The exact wording may vary depending on the version of the EA App you are using.
- The EA App will then begin the verification process, checking for any missing or corrupted files in your game installation. The app will automatically download and replace the problematic files if any issues are detected.
- Once the verification process is complete, you’ll receive a notification. You can now launch your STAR WARS Jedi Survivor game and enjoy a seamless gaming experience
4. Ensure Storage Space is Enough
Star Wars Jedi: Survivor is a huge game and requires a lot of space, and you’ll more than the required 150GB of space to unpack it.
5. Move the Game to an SSD
If you have a solid-state drive (SSD), moving the game to the SSD can significantly improve the unpacking speed. This is because SSDs are much faster than traditional hard drives.
6. Upgrade your Hardware
If you have an older computer or a slower hard drive, upgrading to a faster hard drive or adding more RAM can help improve the unpacking speed.
7. Disable Anti-virus Software
Anti-virus software can sometimes interfere with the unpacking process and slow it down. Try temporarily disabling your anti-virus software and see if this improves the unpacking speed.
If you’ve any anti-virus software like Norton, McAfee, Kaspersky, Bitdefender, Avast, AVG, & Malwarebytes, then try to disable them.
8. Turn Disk Write Caching Off
It is advisable to temporarily disable disk write caching on Windows to avoid conflicts with multiple third-party programs that may interfere with this feature. This prevents any loss of data in case of power or hardware failure. To do so, just follow the below steps;
- Right-click on My Computer > Click on Properties.
- Click on the Hardware tab > Click on Device Manager.
- Expand Disk Drives and right-click on the drive where you want to turn disk write caching on or off.
- Then click on Properties > Select the Policies tab.
- Click to select or clear the Enable write caching on the disk checkbox as appropriate.
- Next, click on OK.