Are you getting the Destiny 2 error code bee on your PC? If so, you’re not alone. This error is a common problem that can occur for various reasons. But don’t worry, there are a few things you can do to fix it.
Destiny 2’s Bee Error is like a buzzing bee in the game’s online system. It appears when your PC’s link to the game’s servers gets shaky due to things like bad internet or crowded servers. If your network settings aren’t right, the problem gets worse.
In this article, we’ll walk you through the steps to fix Destiny 2 error code bee on your PC. We’ll also explain what causes the error and how you can prevent it from happening in the future.
What Causes the Destiny 2 Error Code Bee on PC & PS5
There are many reasons why the Destiny 2 bee error occurs. Here are some of the causes;
- BEE, FLY, and LION error codes stem from disconnections between your device and Bungie’s servers.
- These disconnections result from packet loss, internet congestion, or issues like faulty wiring.
- Overuse of bandwidth by other devices or applications can also trigger these errors.
- Background apps running alongside the game can contribute to disconnections.
- These errors have been observed in specific geographic clusters, possibly due to regional network problems.
How to Fix The Error Code Bee in Destiny 2 on PC
To fix the error code bee in Destiny 2 on your PC, then try the below quick fixes to solve your problem;
- Disconnect Other Devices from Your Network.
- Restart Your Network Router, Game & the System.
- Switch to a Wired Connection.
- Check the Destiny 2 Server Status.
- Allow Windows Firewall Defender Access
In case, the problem persists, then try the below potential fixes;
1. Disable Bandwidth-Intensive Processes
Big programs like those for sharing files or watching videos use a lot of internet space. If you close them while playing Destiny 2, it might help with the bee error. But there are hidden things also using space that you might not be aware of.
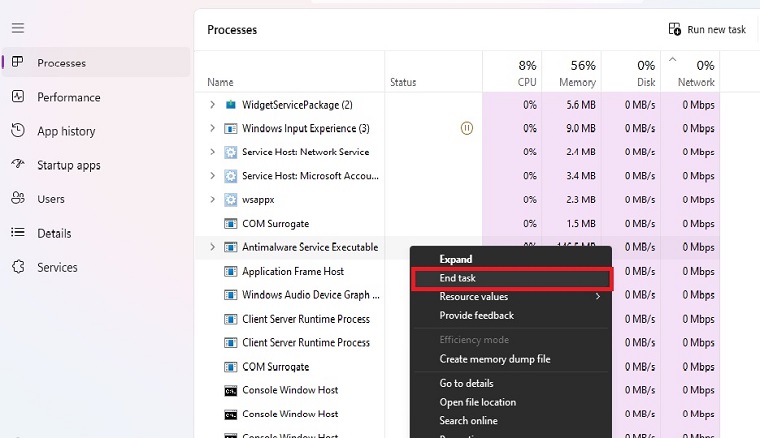
Step 1: Open the Task Manager (CTRL + Shift + ESC).
Step 2: Click on the Network tab.
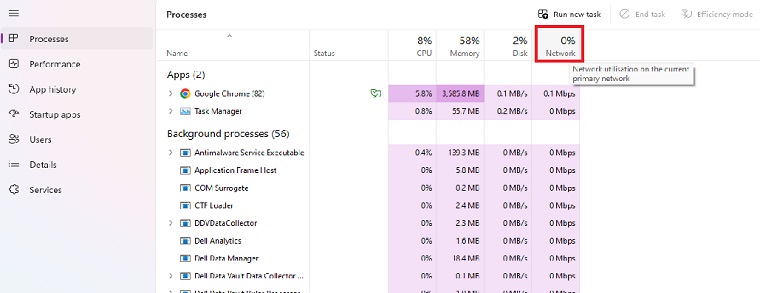
Step 3: Review the list and find the processes that use a lot of bandwidth.
Step 4: Disable the processes you don’t need by right-clicking on them and selecting End task.
Don’t disable processes that you are not familiar with. This can result in Windows-related issues and security vulnerabilities. Once you discover that a specific program is using a lot of bandwidth, you can also close it from the program interface.
2. Update the Network Driver
Whether you’re using a cable or Wi-Fi, having the latest network drivers makes sure your system works properly. To update the network drivers, just follow the below steps;
Step 1: Click on the Windows icon in the left part of the taskbar and type Device Manager.
Step 2: Click on the Device Manager app from your search results.
Step 3: Right-click on the Network adapters and select Scan for hardware changes option.
Step 4: After the scan, Double-click on Network adapters. A list with all network devices will appear.
Step 5: Update the drivers of all of the devices on the list. To do so, right-click on them and select the Update driver option from the menu.
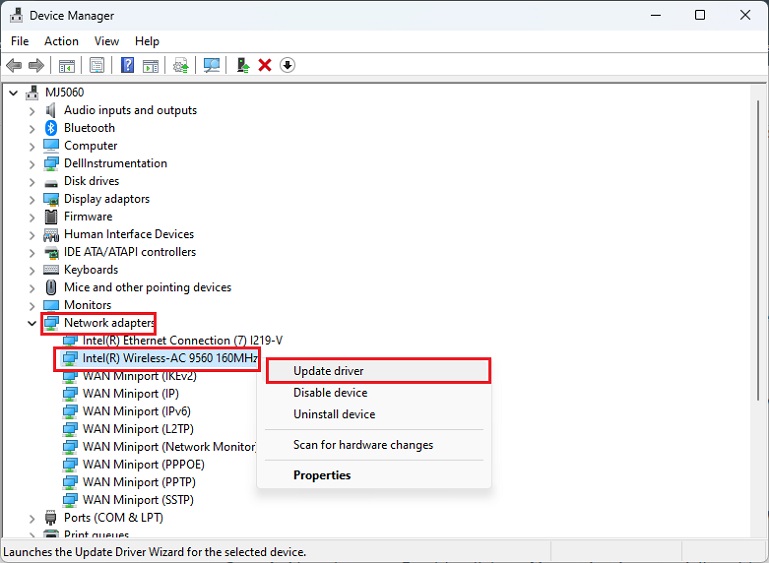
Step 6: Select Search automatically for the driver’s option.
As an alternative, you can use Driver Easy and make the whole process seamless. Simply download the software and install it, upon launching click on check for updates and let the software find the latest drivers for your hardware. Once the process is complete install the drivers and restart your PC.
3 . Try Servers in Another Region
Some players reported that changing to other servers could stop the disconnection. To check if this is a regional issue, you can try switching to another region and test the gameplay.
Just keep in mind that currently you can’t change your Destiny 2 server on Steam. If you’re on Steam, you can jump to the next fix below.
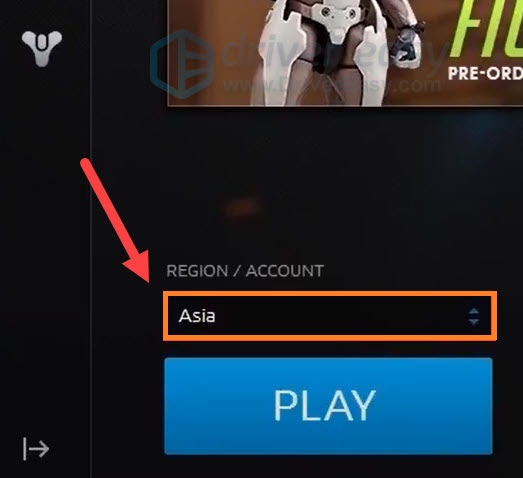
Here’s how you can change your server on the Battle.net client:
Step 1: Open your Battle.net client and sign out.
Step 2: In the log-in window, click the globe icon to change your region. Then log in as you normally do.
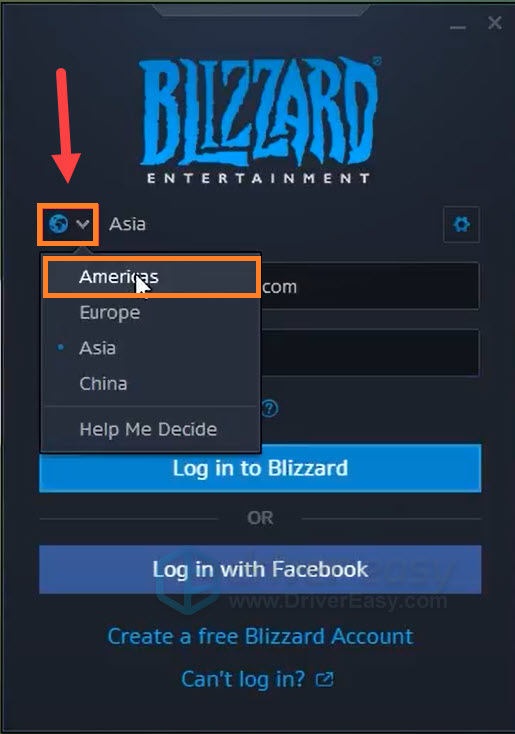
Step 3: At the bottom left corner, click the box under REGION/ACCOUNT and change your region.
Now you can launch Destiny 2 and check the connection. If the error code reappears, you can try the next fix.
4. Use a VPN
Some of the users suggest that using a VPN resolved their error code bee in Destiny 2 on PC. Though VPN can boost the speed, however, this can also be the reason for Destiny 2 error code bee on the PC.
If you’re not sure how to choose the best VPN, we recommend downloading NordVPN. NordVPN is a well-known VPN around the world. You can easily set up & login into NordVPN.
5. Enable Static IP Address
Bungie suggests router issues might cause the error. You can fix it without calling your Internet Service Provider. Set a Static IP on your PC to improve connections. This also helps enable Port Forwarding for Destiny 2. First, get router info for setting up Static IP in Windows.
Step 1: Gather Router Details
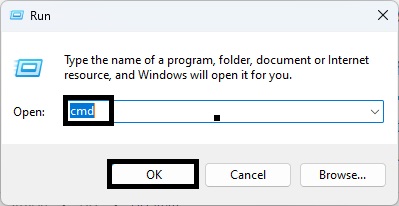
- Open the Windows Command Box by pressing Windows Key + R keys.
- Type ‘CMD‘ and run it.
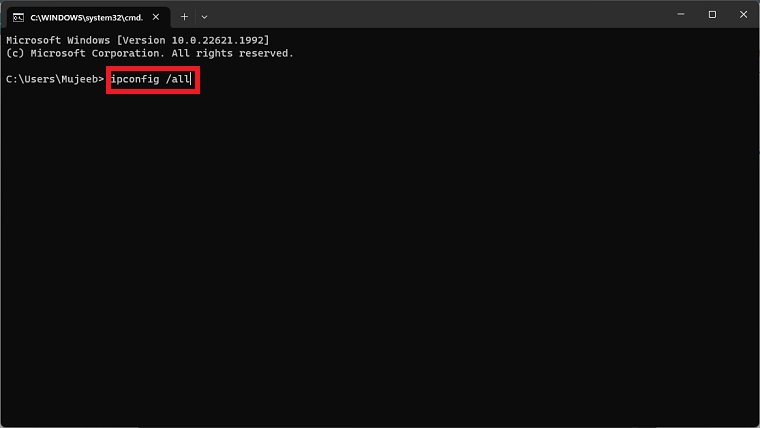
- Enter “ipconfig /all” and press enter.
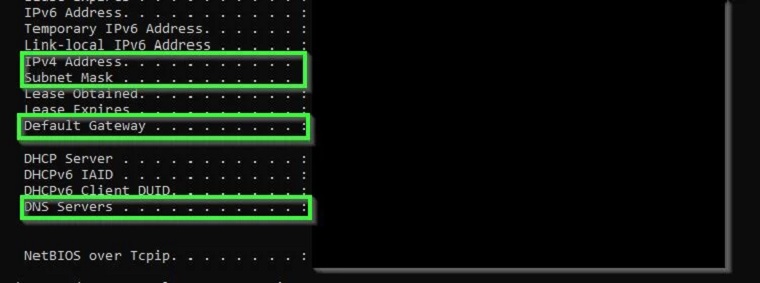
- Note down your IPv4 Address, Subnet Mask, Default Gateway, and DNS Servers.
Step 2: Access Network Settings
- Press Windows + R keys again.
- Type “npca.cpl” and hit Enter.
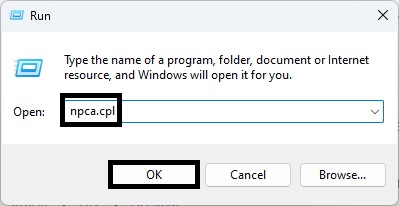
- Choose your network connection (wired/wireless) and click Properties.
Step 3: Modify IPv4 Settings
- Open Internet Protocol Version 4 (TCP/IPv4) properties.
- Select “Use the following IP Address“.
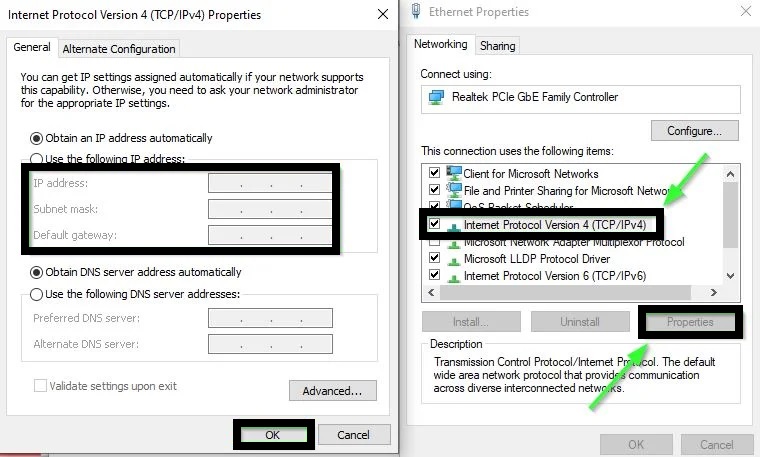
Step 4: Fill in Router Details
- Enter the noted router details: IP address, Subnet mask, Default gateway, and DNS servers.
Step 5: Alternative DNS (Optional)
- Optionally, use Google DNS: Preferred DNS Server: ‘8.8.8.8‘, Alternate DNS Server: ‘8.8.4.4‘.
These steps guide you in setting up a static IP address for better connection stability in Destiny 2.
6. Contact your ISP
If you’re still getting the bee error in Destiny 2, contact your internet provider.
- Find their technical support phone number, usually on your monthly bill.
- Call and tell them about the connection problem in the game.
- Explain what you’ve tried already.
- They’ll guide you through fixing it.
How to Fix Bungie Error Code Bee in Destiny 2 on PS5 & Xbox Series
To fix the error code bee in Destiny 2 on PS5 & Xbox Series, then follow the below potential fixes to solve your problem;
1. Restart Your Console and Clear the Cache
The game stores temporary files in the console’s memory. If these files get messed up, the game might not work right and you could see the bee error in Destiny 2. To fix this, try restarting your console and deleting the cache.
For Xbox Series
Step 1. Hold the Power button on the Xbox console until the system is turned off completely.
Step 2. Disconnect the power cable from your console, and then hold the Power button again to release the power. By doing so, it will clear the cache and format the Xbox memory.
Step 3. Reconnect the power cable and wait for the light on the console changes from white to orange.
Step 4. Turn your Xbox One on again and see if the Destiny 2 error code bee still persists.
Alternatively, you can clear the cache through Settings. In the Settings window, go to the Xbox settings > Network > Advanced Settings > Alternate Mac Address > Clear.
For PS5/4
If you encounter the error code bee Destiny 2 when playing the game on PS4, you can hard reset the PS4 to clear the cache. Here’s how to do that:
Step 1. Hold the power button for 7 seconds until you hear the beeps.
Step 2. Unplug all power supply cables.
Step 3. Hold the power button again to discharge the internal power supply.
Step 4. Reconnect the supply cables and start your PS4 normally. Now, you can see if the Destiny error code bee is fixed or not.
2. Check the Internet Connection
The bee error in Destiny 2 often happens because of internet problems. To fix this, try these steps for network issues. If you’re using Wi-Fi or a mobile hotspot, try using a wired connection instead.
In addition, you can follow the tips below to check the internet connection:
- Check if your router/modem is faulty. To do so, you can run the Internet Connections Troubleshooter or switch to another wireless connection.
- Contact your ISP provider to diagnose the potential network stability, traffic, and packet loss issue.
- You can replace the old equipment that you have used for a long time.
After that, you can replay the game and see if the error code bee Destiny 2 has been resolved.
3. Port Forwarding
In order to get better connectivity to Bungie servers, you can port forwarding on your router for Destiny 2. First of all, you need to know which port Destiny 2 uses.
Destiny 2 for PlayStation 4:
- TCP: 1935,3478-3480
- UDP: 3074,3478-3479
Destiny 2 for Xbox One:
- TCP: 3074
- UDP: 88,500,1200,3074,3544,4500
Destiny 2 for Steam:
- TCP: 27015-27030,27036-27037
- UDP: 3074,3097,4380,27000-27031,27036
Here we take PS4 users for example. You can follow this simple guide to port forwarding:
Step 1. Find the IP address and then turn on your PS4 system.
Step 2. Open the Setting menu from the PS4 dashboard, and then navigate to Network > View Connection Status.
Step 3. Go to the IP Address on the screen and write it down. You need to use this PS4 IP address to enable port forwarding. Besides, you need to write down the MAC address of your PS4.
Step 4. Now, you can use the IP address that you just found on PS4 to port forwarding.